• Advertisement

Make a small donation to Ye Olde Inn!

Donate via Paypal

Every cent received goes toward Ye Olde Inn's maintenance and allows us to continue providing the best resources for HeroQuest and Fantasy Gaming fans.

[Tutorial] - Card Images

Discuss card making and cards you have made.

[Tutorial] - Card Images

Postby drathe » June 25th, 2010, 4:57 pm

A few people would like to know how I turn images from this:
Image

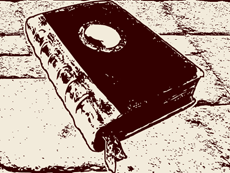
into an image like this:
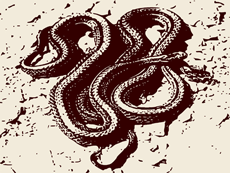
Image

Here's a simple tutorial on how it's done:

    Requirements:
  • Decent Images
  • Inkscape
  • Photoshop, or similar graphics program.
  • Knowledge on how to use Photoshop, or similar graphics program.

Please note that Inkscape and especially Photoshop are resource hungry programs. Your compies should be up to snuff if you are to use them.

  1. First up, find some decent images. The clearer and larger the better. We'll take this one for now (tutorial shows thumbnails of the images used):
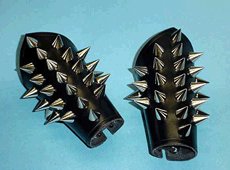
    Image
  2. Open Inkscape and import the image.
  3. Click the Zoom icon in the menu across the top to place the image completely inside the window. The Zoom icons look like magnifying glasses.
  4. Now open the trace window. Do this by selecting Path from the text menu across the top and selecting Trace Bitmap.
  5. Under the Mode tab, ensure Brightness Cutoff is selected. The Threshold is 0.45 by default. Start with that and click the update button.
    Image
  6. Depending on the original brightness of the image, you may need to adjust the threshold. Increase to darken, decrease to lighten. I usually go by 0.05 when I increase, or decrease. Once I find a suitable range I increase, or decrease by 0.01 to find the best. Click the update button again to see if the image is better.
  7. Once you are satisfied, click OK. The tracer will begin smoothing all the edges and create a black image in a new layer over the original.
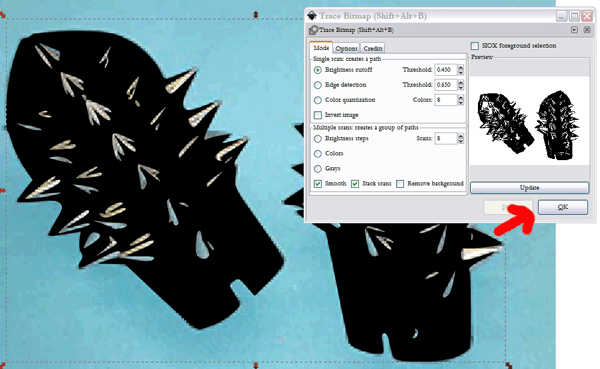
    Image
  8. Delete the original image layer. Click an area that does not appear black from the new layer and hit the delete button on the keyboard. If you are having trouble, or keep deleting the wrong layer, click Undo. Then left-click and hold on the black area and drag the image to the side. Now you can easily click on an area of the original layer and delete it.
    Image
  9. Now it's time to Save As. When saving as, select the .eps extension from the drop-down menu in the save window. Name your new vector image and click OK.
  10. Now it's on to Photoshop! Open Photoshop and open the .eps file.
  11. Ensure the Resolution is set to 300 pixels/inch and the Mode is set to RGB Colour.
  12. Use the Magic Wand tool. Set the Tolerance anywhere from 20 to 35. Check Anti-alias, Uncheck Contiguous and Sample All Layers. Now click any of the black areas of the image.
    Image
  13. Create a new layer. Using the Paint Bucket tool, click on the black area selected by the Magic Wand with the desired colour. #330000 in this case. Mode set to normal, Tolerance the same as your Magic Wand, between 20 to 35. Uncheck Contiguous.
    Image
  14. Adjust the Image Size from the Image text menu. Width of 500 pixels and height of 375 pixels is what fits in the image box of the North American Card Templates provided at Ye Olde Inn. You may wish to adjust the Canvass Size under the Image text menu to give some extra space around the image prior to adjusting the Image Size.
  15. Once you have the Image Size you want, Deselect the Magic Wand selection and create a new layer. Move the new layer behind the layer you filled in with the Paint Bucket.
  16. Using the Paint Bucket again with the same settings, fill the entire layer with the desired colour. #F2EBDB in this case.
    Image
  17. Save As .jpg using your preferred Image Quality setting.

This method works best for images that are already monotone, or duo-tone.
Image Image

With a little Photoshop knowledge you can even add a bit of a fancier background to the image.
Image

Or, combine several images together. One for a background, and a couple to create a new image.
Image Image Image

Becomes...

Image

With practice, the possibilities become endless. Enjoy!
Image


Rewards:
Played a turn in a Play-by-Post game. Wrote an article for the Blog. Created a Hot Topic. Participated in a Miniature Exchange. Zealot Miniatures: Twisting Catacombs Kickstarter Backer
User avatar
Lord
drathe
The Bastiferous!

Innkeeper
Innkeeper
 
Posts: 2935
Images: 103
Joined: August 16th, 2008, 2:55 pm
Location: Niagara Region, Ontario, Canada
Forum Language: British English
Hero:
Evil Sorcerer: Morcar
Usergroups:
Innkeepers Group Member Wizards of Zargon Group Member Adventurers' Guild Group Member Artists Group Member Champion Group Member Scribes Group Member

Advertisement

Make a small donation to Ye Olde Inn!

Donate via Paypal

Every cent received goes toward Ye Olde Inn's maintenance and allows us to continue providing the best resources for HeroQuest and Fantasy Gaming fans.

Re: [Tutorial] - Card Images

Postby LurchBrick » June 25th, 2010, 7:26 pm

Excellent tutorial. I've already started working on some pics I have.


Rewards:
Created a Hot Topic.
LurchBrick

Gargoyle
Gargoyle
 
Posts: 146
Joined: July 23rd, 2009, 9:13 am
Usergroups:
Champion Group Member

Re: [Tutorial] - Card Images

Postby HeroQuestFrance » June 26th, 2010, 5:06 am

Stargate door... drathe but how in the hell are you finding such ideas to make images !! :lol:


Rewards:
Created a Hot Topic.
User avatar
HeroQuestFrance

Orc Shaman
Orc Shaman
 
Posts: 390
Joined: January 14th, 2009, 11:27 am
Location: FRANCE
Usergroups:
Champion Group Member

Re: [Tutorial] - Card Images

Postby mo123813 » June 26th, 2010, 9:22 am

Could you put up some links for some free photoshop programs?
Check out my new character: Halfling! I promise you will consider using it!
viewtopic.php?f=35&t=405
Remember, if you run out of dice,
3/4/5 = skulls
1/2 = white shields
6 = black shields
User avatar
mo123813

Ogre Chieftain
Ogre Chieftain
 
Posts: 247
Joined: May 24th, 2010, 12:29 am
Evil Sorcerer: Zargon
Usergroups:
Adventurers' Guild Group Member Champion Group Member

Re: [Tutorial] - Card Images

Postby Ethica » June 26th, 2010, 12:06 pm

That's very useful, thanks.

I think it's important to have them look similar to the propper cards. Some people use greyscale images, but that looks crappy.

I'm working on a bunch of new spell sets. I'll post them when I'm done.


Rewards:
Created a Hot Topic.
User avatar
Ethica

Giant Wolf
Giant Wolf
 
Posts: 751
Images: 19
Joined: January 14th, 2009, 3:43 pm
Location: Suffolk, UK
Hero:
Evil Sorcerer: Morcar
Usergroups:
Adventurers' Guild Group Member Artists Group Member Champion Group Member

Re: [Tutorial] - Card Images

Postby drathe » June 26th, 2010, 2:37 pm

mo123813 wrote:Could you put up some links for some free photoshop programs?


Inkscape is free. Link was provided. I don't know of any free Photoshop links. Some people use GIMP, it's free I believe, but I've never used it so I don't know how similar it is.


LurchBrick wrote:Excellent tutorial. I've already started working on some pics I have.


Awesome. Feel free to share the results with us. :D


HeroQuestFrance wrote:Stargate door... drathe but how in the hell are you finding such ideas to make images !! :lol:


Most of the time, they just pop in my head. :ugeek:
Image


Rewards:
Played a turn in a Play-by-Post game. Wrote an article for the Blog. Created a Hot Topic. Participated in a Miniature Exchange. Zealot Miniatures: Twisting Catacombs Kickstarter Backer
User avatar
Lord
drathe
The Bastiferous!

Innkeeper
Innkeeper
 
Posts: 2935
Images: 103
Joined: August 16th, 2008, 2:55 pm
Location: Niagara Region, Ontario, Canada
Forum Language: British English
Hero:
Evil Sorcerer: Morcar
Usergroups:
Innkeepers Group Member Wizards of Zargon Group Member Adventurers' Guild Group Member Artists Group Member Champion Group Member Scribes Group Member

Re: [Tutorial] - Card Images

Postby Jaguar69 » January 24th, 2011, 11:18 pm

drathe, would I be able to use the image of the B&W book you posted at the bottom of the original post? It is awesome, and just the sort of thing I have wanted to put together. Or even the colour book would be of great help.
I have thought about using books of knowledge scattered throughout a quest pack that allows the Wizard and Elf to 'level up' become able to use new spell sets that they 'learn'. These books will be searchable as treasure from bookcases, but not necesarily in the treasure deck.
User avatar
Jaguar69

Mummy
Mummy
 
Posts: 86
Joined: January 21st, 2011, 7:46 pm
Location: Suffolk, UK
Hero:
Evil Sorcerer: Morcar
Usergroups:
Champion Group Member

Re: [Tutorial] - Card Images

Postby Jaguar69 » January 25th, 2011, 10:55 am

Just a heads up everyone. If you are going to use drathe's awesome tutorial here please note that Inkscape latest version is 0.48. There is a bug for people using Windows XP. :?
When you go to trace bitmap in Inkscape, the preview will not show up on brightness cuttoff, the preview will turn blank white. :cry:

I have done some research on it, and it is a confirmed bug. However if you press ok, making sure you have selected an image to trace every time, it will preview and create the trace. This is the only way to make this work. If you are not happy with the trace, you can juste delete that layer and adjust the cuttoff again and press ok again. This is still an amazing bit of software, but a little more work to use this way.
There is no planned official workaround, so until version 0.49 etc XP users will have to make do this way!

Hope this helps some of you!! ;)
User avatar
Jaguar69

Mummy
Mummy
 
Posts: 86
Joined: January 21st, 2011, 7:46 pm
Location: Suffolk, UK
Hero:
Evil Sorcerer: Morcar
Usergroups:
Champion Group Member

Re: [Tutorial] - Card Images

Postby drathe » January 25th, 2011, 12:20 pm

Jaguar69 wrote:drathe, would I be able to use the image of the B&W book you posted at the bottom of the original post?


Feel free.
Image


Rewards:
Played a turn in a Play-by-Post game. Wrote an article for the Blog. Created a Hot Topic. Participated in a Miniature Exchange. Zealot Miniatures: Twisting Catacombs Kickstarter Backer
User avatar
Lord
drathe
The Bastiferous!

Innkeeper
Innkeeper
 
Posts: 2935
Images: 103
Joined: August 16th, 2008, 2:55 pm
Location: Niagara Region, Ontario, Canada
Forum Language: British English
Hero:
Evil Sorcerer: Morcar
Usergroups:
Innkeepers Group Member Wizards of Zargon Group Member Adventurers' Guild Group Member Artists Group Member Champion Group Member Scribes Group Member

Re: [Tutorial] - Card Images

Postby SinghSTAR » January 25th, 2011, 2:27 pm

Jaguar69 wrote:When you go to trace bitmap in Inkscape, the preview will not show up on brightness cuttoff, the preview will turn blank white. :cry:


Windows 7 has the same bug. But thanks for clearing that up, Jaguar69, it's much easier now!
SinghSTAR

Skeleton
Skeleton
 
Posts: 24
Joined: January 12th, 2011, 5:13 pm
Hero:
Evil Sorcerer: Morcar
Usergroups:
Champion Group Member

Next

Return to Cards

Who is online

Users browsing this forum: Bing [Bot] and 2 guests